Recently, I've been exploring the Apple Vision Pro, since Mike and I got access to the device from one of our friends. Spatial photos and videos are some of the most interesting things to look at and they offer an immersive viewing experience that really blows your mind. You can pan, drag, zoom, and really engage with the images much more than when they're on your phone.
However, the 2D photos on my phone weren't easily viewable spatially on the vision pro. That got us thinking, what can we do to convert our old photos into spatial photos?
I looked at various tools online and pieced them together to build a makeshift converter. Feel free to clone it and convert your own 2D photos to Spatial Photos -> github/studiolanes/vision-utils.
The Pipeline
- Depth Map Generation
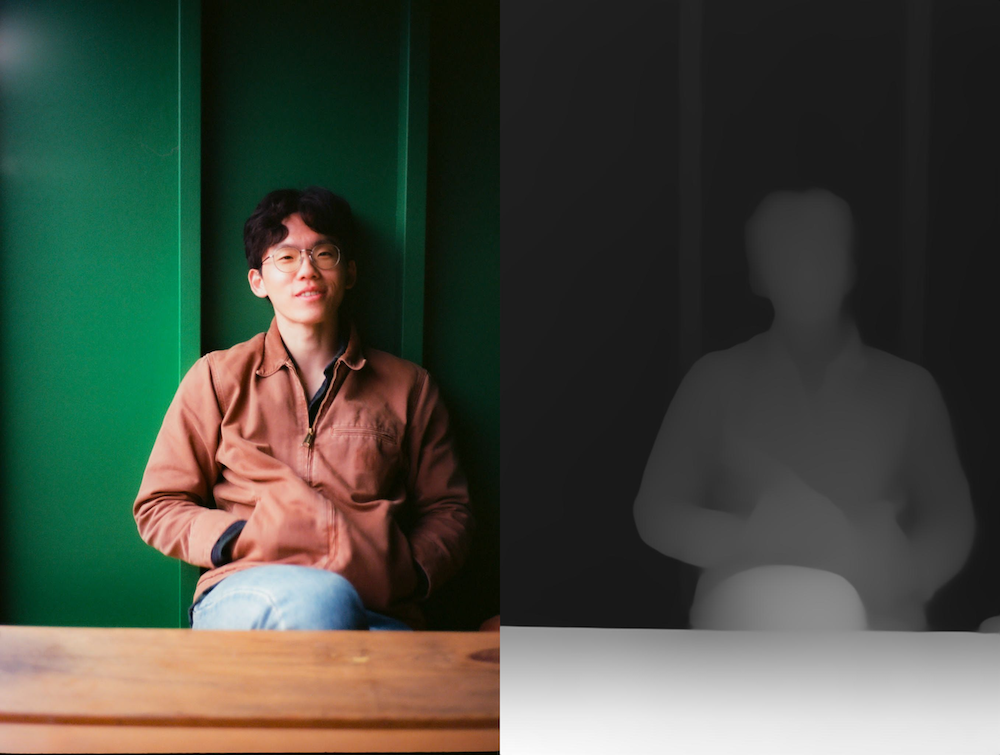
The key to adding dimensionality to a 2D photo is using a depth map. I used a state of the art depth estimation model from the Depth Anything Repo. Below is a Python snippet that shows how to get a quick depth map:
from transformers import pipeline
from PIL import Image
pipe = pipeline(task="depth-estimation", model="LiheYoung/depth-anything-large-hf")

# load image
image = Image.open(IMG_PATH)

depth = pipe(image)["depth"]
depth.save("~/Downloads/depth.jpg")
Thank you open source, that's all we need to get the map that we need. There are some parameters you can adjust to suit your need for a more precise representation. Here is what an example output from the model looks like.

- Stereo Image Creation
With the depth map in hand, we can now create stereo images to simulate binocular vision. This involves shifting pixels based on the depth information and filling in the holes with a best effort guess at the color fill.
def shift_image(image, depth_image, shift_amount) -> Image:
def inpaint_image(image) -> Image:
Shifting the image moves the pixels from one area to another by some designated shift amount. We just chose arbitrary numbers for this. However, choosing arbitrary numbers doesn't really result in a picture with good resolution. So, there's some adjustment still involved here. Using your eye separation as a factor would probably improve this quite a bit.
Inpainting fills in the holes left behind from the shifted image. If you don't inpaint, you're left with black or white lines depending on how you represented the colors. Once you run these functions on your image, you'll be able to produce the desired shifted photos.
- HEIC Photo concatenation
We need a way to combine a few images, and we found that creating a CLI app using Swift to be pretty quick and easy, since it had some native support for HEIC. This Swift function takes care of combining the images to render for the 3D effect.
 func combineImages(leftImg: CGImage, rightImg: CGImage, outputPath: String) {
        let newImageURL = URL(fileURLWithPath: outputPath)
        let destination = CGImageDestinationCreateWithURL(newImageURL as CFURL, UTType.heic.identifier as CFString, 2, nil)!

        let imageWidth = CGFloat(leftImg.width)
        let imageHeight = CGFloat(leftImg.height)
        let fovHorizontalDegrees: CGFloat = 55
        let fovHorizontalRadians = fovHorizontalDegrees * (.pi / 180)
        let focalLengthPixels = 0.5 * imageWidth / tan(0.5 * fovHorizontalRadians)
        let baseline = 65.0 // in millimeters

        let cameraIntrinsics: [CGFloat] = [
            focalLengthPixels, 0, imageWidth / 2,
            0, focalLengthPixels, imageHeight / 2,
            0, 0, 1
        ]

        let properties = [
            kCGImagePropertyGroups: [
                kCGImagePropertyGroupIndex: 0,
                kCGImagePropertyGroupType: kCGImagePropertyGroupTypeStereoPair,
                kCGImagePropertyGroupImageIndexLeft: 0,
                kCGImagePropertyGroupImageIndexRight: 1,
            ],
            kCGImagePropertyHEIFDictionary: [
                kIIOMetadata_CameraModelKey: [
                    kIIOCameraModel_Intrinsics: cameraIntrinsics as CFArray
                ]
            ]
        ]

        CGImageDestinationAddImage(destination, leftImg, properties as CFDictionary)
        CGImageDestinationAddImage(destination, rightImg, properties as CFDictionary)
        CGImageDestinationFinalize(destination)
    }
This Swift function is all you really need to combine the images along with the metadata needed to get the 3D effect. With this, I archived the project to produce a command line executable to run from the terminal.
NOTE: We also played around with some of the Python libraries, which bind to libheif. It seems like the metadata exists in the exif metadata, but none of the libraries parse the bytes properly to make it easy to write metadata out of the box. We're unsure if the metadata is necessary because some spatial photos we've seen do not have metadata and others do. This is something that is worth contributing to add some extra support if anyone has time.
Output
Below is a recording of what the converted Spatial Photo looks like in the Vision Pro simulator. Fun fact - the photo I converted is a 2d photo of Mike, taken from a Contax T2 which was released in 1991.
Future
After going through these three steps, I was able to transform some ordinary photos to spatial photos ready for the Vison Pro! Try out these techniques and experiment with your own images. If you don't want to run all this yourself, feel free to pull https://github.com/studiolanes/vision-utils and try that out.
If you wanna chat more or wanna reach out, feel free to send me message at [email protected].